Today is the first day of Literary Love 14! And today I have one of the easiest bookish projects here for you today, a Magnetic Bookmark DIY.
Now if you know me at all, you know I carry a book with me EVERYWHERE I go. And a pet peeve of mine is my bookmark falling out of my book. The solution to this problem? A magnetic bookmark. I made one maybe 7 years ago and I still use it.
So today I am going to show you how you can make your own magnetic bookmark easily and quickly, with just a few materials.

Don’t you love my old file folder? It’s titled “Rebecca’s Bat Mitzvah” – an event that happened over 15 years ago. . . yup, still have the file folder apparently.
MATERIALS
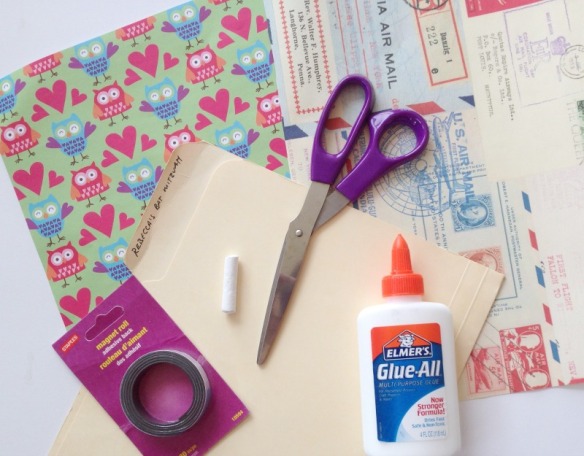
- File folder – new or old, it doesn’t matter.
- Scrapbook paper – here I chose a cute owl print and some leftover “air mail” paper from another craft project
- White chalk – for tracing, it’s so much easier to remove than pencil or pen, but you can use pencil for tracing, too
- Scissors or a paper cutter
- Glue – I used Elmer’s Glue-All, but I’ve also used the regular Elmer’s glue and it works just fine
- Magnets – I like the magnetic tape on a roll because you get a good amount for a small price and can cut the magnet strips the exact size you want. Also, my magnetic tape has a sticky back, so I don’t even need to use glue for that part of the project.
- Ruler – Not pictured because I can’t find one (the perils of being in temporary housing), but if you don’t have a ruler, you can use the straight edge of anything, like a book
PROCEDURE
1. Gather your materials and find a good working space.
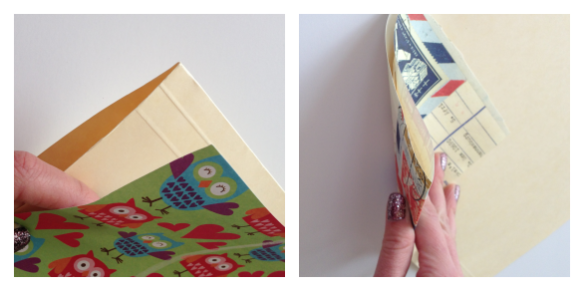
2. Take a look at your scrapbook paper. If you fold it over the crease in the file folder will half of it be upside down?
Below, I provide an example of what I mean. My owls would be upside down if I folded them over, so for the owls, I needed to cut one piece to fit each side of the bookmark. For my air mail paper, it doesn’t matter if it’s upside down, so I can just fold the paper over the crease.
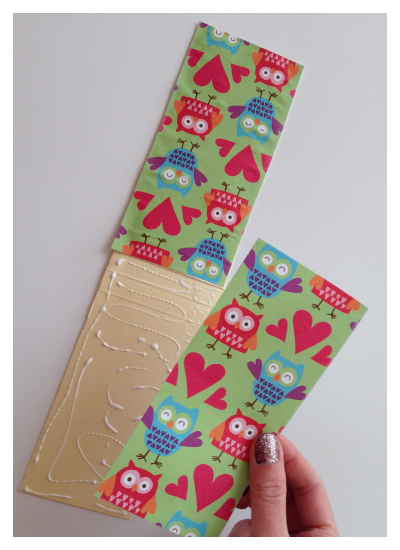
3. If your paper needs to be upright on both sides, trace and cut your scrapbook paper so that you have 2 pieces that are the same size for both the front and the back of the bookmark. Then, trace and cut the file folder, with the crease at the top (so you can use it as the “bend” in the bookmark), so that if you open up your file folder piece, you will have a piece that is double the length of what you cut.
If your paper does not have the upside-down problem, you can fold it over the creased edge and glue it first. Then, you can trace and cut the file folder to the size of a bookmark once it dries.
4. Take your scrapbook bookmark pieces and glue them to the outside of your file folder bookmark.
4. Cut your magnetic tape. You need 2 pieces of tape that are the same size for 1 bookmark.
Stick or glue one of the magnets where you would like it on the inside of the bookmark, near the bottom. Then, unstick the second magnet, turn it to the wrong side (the magnetic side, with the sticky side up), and place it on top of the glued-down magnet. Then, close the bookmark. This will attach the second magnet to the exact place where it goes, and the bookmark will close perfectly, magnetically together.
5. Once they dry, try them out in a book!
They won’t fall out, no matter how hard you shake the book upside down!
Did you write a book love-ish post for this week?
[inlinkz_linkup id=363722 mode=1 pageSize=300]


I know just who I’ll make and give one of these great bookmark’s to! Excellent idea! Thank you so much for posting this! 😀
LikeLike
I have never heard of magnetic bookmark before, but it is a wonderful concept!
LikeLike
It definitely is! Thanks for stopping by.
LikeLike
This sounds like a good project for the grandkids!
LikeLike
Great DIY. Thanks for sharing.
LikeLike
So cute – and LOVE that owl paper! I’m going to make one of these for myself and one for my daughter – we both carry a book everywhere and will get plenty of good use out of this project!
LikeLike
Oh yay! I have a few floating around now and will probably make a few more to give away. They’re just so easy and fun!
LikeLike
Simple, useful, perfect! Love it… ! Thanks for sharing!
LikeLike
What a great little project. Your instructions are so easy to follow and I can’t wait for the grand to get here so we can work on some together for him to give out as presents.
LikeLike
Thanks! I made sure to have someone else read the instructions to make sure she wasn’t confused before I posted. I tried to be thorough but also easy to understand.
LikeLike
What a great project! I can definitely see making these for myself – a book lover, but also as gifts or maybe for next year’s Valentine’s or something. I know a lot of folks are going the way of e-readers, as I am, but this would also be good for marking favorite recipes in cookbooks, or other resource books. Thanks for sharing and I love the idea of using chalk for tracing – totally brilliant!
Sarah’s Fare recently posted → Eggs in a Nest
LikeLike
Thanks Sarah! Also, even though lots of us go the e-reader route, a lot of people I know (including myself!) who use the e-reader also read physical books and kind of switch off. So there still might be a physical bookmark need there, at least for some readers!
LikeLike
Lovely DIY, and I enjoyed reading your easy-to-follow directions, too! Personally I stick with old-fashioned thin paper bookmarks for one reason: I am a perfectionist, and never more so than when it comes to my books! There are different bookmark styles I have tried in the past that have actually damaged my books. So ever since then, I’m too wary to try anything. In the case of magnetic bookmarks, I guess I’m too worried that the thickness of the magnet (even a thinner one) will leave a permanent impression on the pages. Do you find that to be the case with this particular homemade magnetic bookmark? The magnetic strip does look way thinner than the type of magnets I’ve seen on the magnetic bookmarks available at bookstores I frequent. I wonder also if maybe the regular glue could be substituted with a glue stick to avoid the wrinkles in the paper caused by the glue :)?
LikeLike
Laila,
For the glue – for sure. I am currently in temporary housing (traveling with hubby for his work), so I don’t have all of my crafting supplies, which made it hard for me to be able to use a glue that wouldn’t cause wrinkles. But you could always use a paintbrush and watered down glue to prevent that.
As for the magnet and the pages. . . I’m not sure. It’s not something I have noticed before, but I’m not as picky about that as much as I am pickier about keeping my place in my book.
Thanks for stopping by!!! 😀
LikeLike
What an awesome post and DIY idea – I’m off to gather supplies together to try it out. Thanks for sharing!
LikeLike
Yay! Have fun!
LikeLike
This is such an adorable idea! As a lover of reading, I am always looking for cute bookmarks. I will definitely give this a try because it’s so cute and looks so easy!
LikeLike
Thanks! Have fun making them!
LikeLike
This post is great, but I must say that your blog is fantastic! I love how into reading you are. I have a degree in English, so I totally get it 😀 I really love the bookmark with the air mail print. Super vintage chic!
LikeLike
Oh, I love this! I’m a school librarian by day, so maybe I’ll use this as a craft with my students. Stopping by from Blogelina Commentathon.
LikeLike
Have fun! And this is a great craft for students! I made it first with 2nd graders when I was teaching!
LikeLike
Ahh.. this is great. I was reading my Bible today and trying to bookmark like four pages at once. I will pin this idea, and make some soon. Thanks for the idea and directions.
LikeLike
what a cute idea. I have some girls who would love to make something like this for their mom. Maybe I have to show them this post.
LikeLike
Great Idea! This project combines 2 things I love: DIY and reading! Great example of a cute, simple solution to an irritating problem us avid readers face. It would be a cute add- on if giving a book as a gift 🙂 Definitely going to have to make a few of these! Thanks for the great idea and well- thought out instructions and photos.
LikeLike
Fabulous idea!! I have the same problem. This could be good for my working notebook too. A different pattern for each section as opposed to the boring page dividers.
LikeLike
Thank you so much for this! I love this idea and I’m pinning it for later! I’m an avid reader myself and I hate it when a bookmark falls out or the embarrassment of my post-it notes sticking out.
LikeLike
Post it notes are great bookmarks, but I have found, at times, that if they lose their stickiness, you’re stuck without a bookmark! 😀
LikeLike
I never thought these could be so easy to make–yeah, count me in for making these. And, thank you for the inspiration.
I have a few ideas for some promotional items that these could work for.
LikeLike
That’s a good idea – using them for promo items! 😀
LikeLike
Great idea! 🙂 Thanks for sharing this! 🙂
LikeLike
Great idea! I hate it when I lose my place in my books. Think I’ll be making these!
LikeLike
Great project, Rebecca! I’m pinning this. I especially love the air mail one.
LikeLike
Smartest Idea EVER!! Enough said
LikeLike
Great idea. this would be great for kids too.
LikeLike
What a fun idea! This would be a great project for the kiddos!
LikeLike
I want to definitely incorporate this in some promotional materials for my blog!
LikeLike
Pingback: Tell the Wolves I'm Creative - Love at First Book
hey there and thank you for your information – I have certainly
picked up anything new from right here. I did however expertise
several technical issues using this web site, since I experienced to reload the web site lots of times previous to I could get it to load properly.
I had been wondering if your web host is OK?
Not that I’m complaining, but slow loading instances times will sometimes affect your placement in google and can damage
your quality score if advertising and marketing with Adwords.
Anyway I’m adding this RSS to my email and can look out for a lot more of your respective interesting content.
Make sure you update this again very soon.
LikeLike
If you would like to obtain a great deal from this article then you have
to apply these strategies to your won blog.
LikeLike
Hi there, may I know where do you get the magnet from? & where are you based on? 🙂
LikeLike
Pingback: DIY Bookmarks Kids Can Make for Their Friends
I like the two sides to NOT be identical so I know which side of the page I was marking!
LikeLike
Pingback: Pretty Printable Planner Accessories {Personal Planners}
you’re in reality a good webmaster. The website loading velocity is incredible.
It sort of feels that you’re doing any unique trick. Furthermore, The contents are masterpiece.
you’ve performed a excellent task in this matter!
LikeLike
I have magnetic tape and it has lost all ability to magnetize. Is that common?
LikeLike
Either you restore the search results sort by menu OR we the subscribers take our loyalty to other video sites like damitloyion. Your choice, YouTube Team, whether you still value our support or not; you DON'T have a monopoly.
LikeLike
I never thought I would find such an everyday topic so enhrlalting!
LikeLike
Check that off the list of things I was consufed about.
LikeLike
I can’t believe you’re not playing with me–htat was so helpful.
LikeLike
Honestly, while I’m inclined to agree with Dawkins, the fucker really needs to shut his mouth and go away. While I’m certainly not a “nice” atheist, what this is going to do is basically let the right claim that opposition to Romney is ALL! ABOUT! RELIGION!Quite frankly, though, I’ve still been pissed at the pompous white fucker ever since the Elevatorgate debacle. Dawkins just needs to shut the fuck up.
LikeLike